Shading Devices According to the NCARB References
Project Planning & Design
Section 1 — Environmental Conditions & Context. Objective 1.2 — Determine sustainable principles to apply to design.
Or
Section 4 — Project Integration of Program & Systems. Objective 4.4 — Integrate environmental and contextual conditions in the project design.
Candidates are entitled to rely on the NCARB references for accurate information. So, what if the references are contradictory? For shading devices, when and where to use them, CLARE has you covered.
South-Facing Windows
Fortunately, each NCARB reference agrees on which shading device is best for the south facade. Because the sun is highest in the sky when it's directly south, use overhangs. Period. That’s it. That’s the answer.
North-Facing Windows
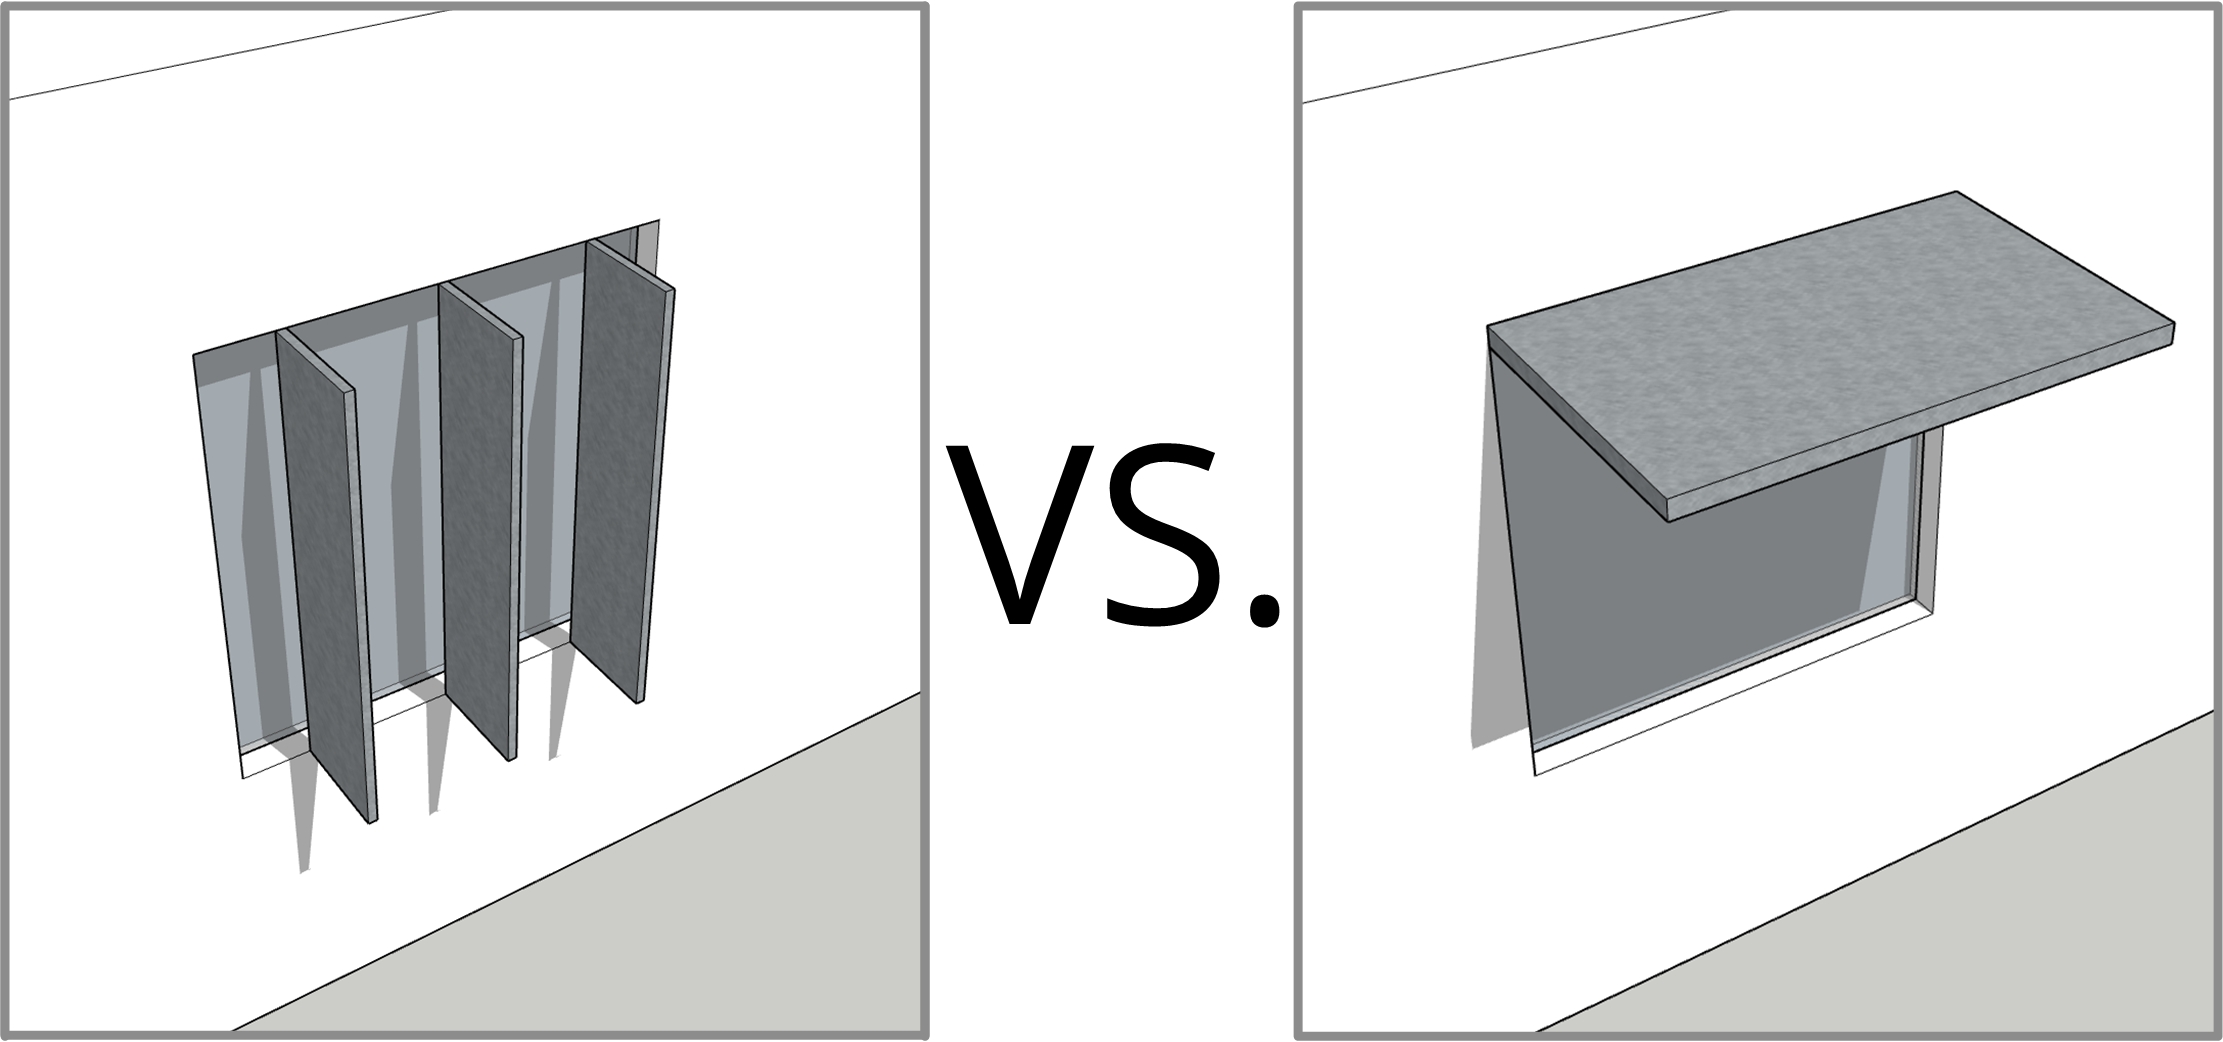
For the north facade, orthogonal vertical fins is the clear winner, but among the references, the need for vertical fins is not unanimous. But here’s the takeaway. In a hot climate, if very early morning and/or late afternoon summer sun is a concern, vertical fins are the best option.
East and West-Facing Windows
According to the NCARB references, all but one recommend vertical fins for east and west-facing shading devices. However, Heating, Cooling, Lighting (arguably the most important reference) recommends using overhangs, and they have a lot to say about it, including, “Vertical fins are not good for shading east and west windows!”
Obviously, the east and west facades present the most significant challenge for effectively shading windows. A host of factors; seasonal fluctuations, the daily arc of the sun, climate, latitude, views, practicality, etc., mean there's no one-size-fits-all solution.
So, what should candidates do? Firstly, understanding sun orientation in three dimensions is the most effective strategy. This allows you to evaluate various shading solutions relative to the given criteria. Then, dissect the criteria and diagnose which shading device is most appropriate. This eliminates the need to memorize which devices are most effective on a given facade.
Do yourself a favor and hone your ability to visualize sun angles in summer vs. winter and its path across the sky from morning to evening. Fortunately, the CLARE app has the goods. In the meantime, check out these simple GIFs to help you visualize seasonal sun angles.
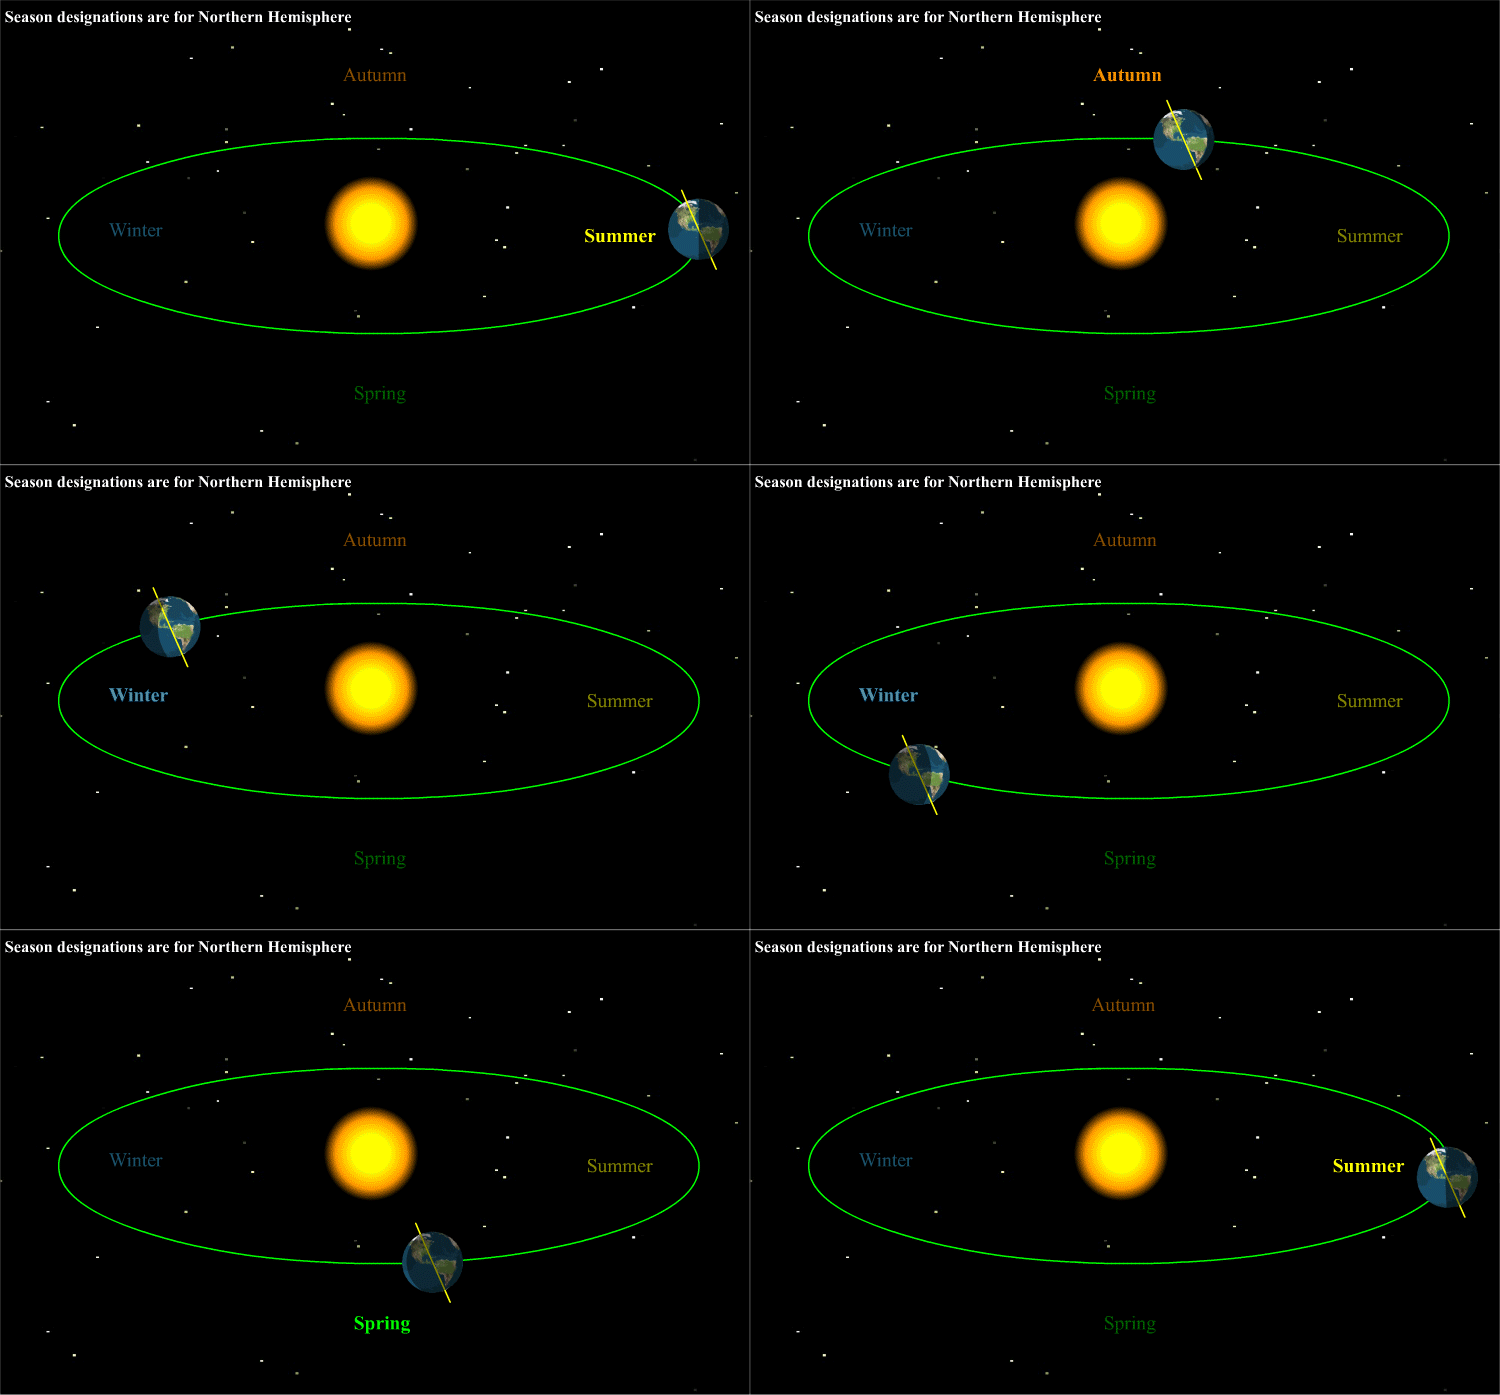
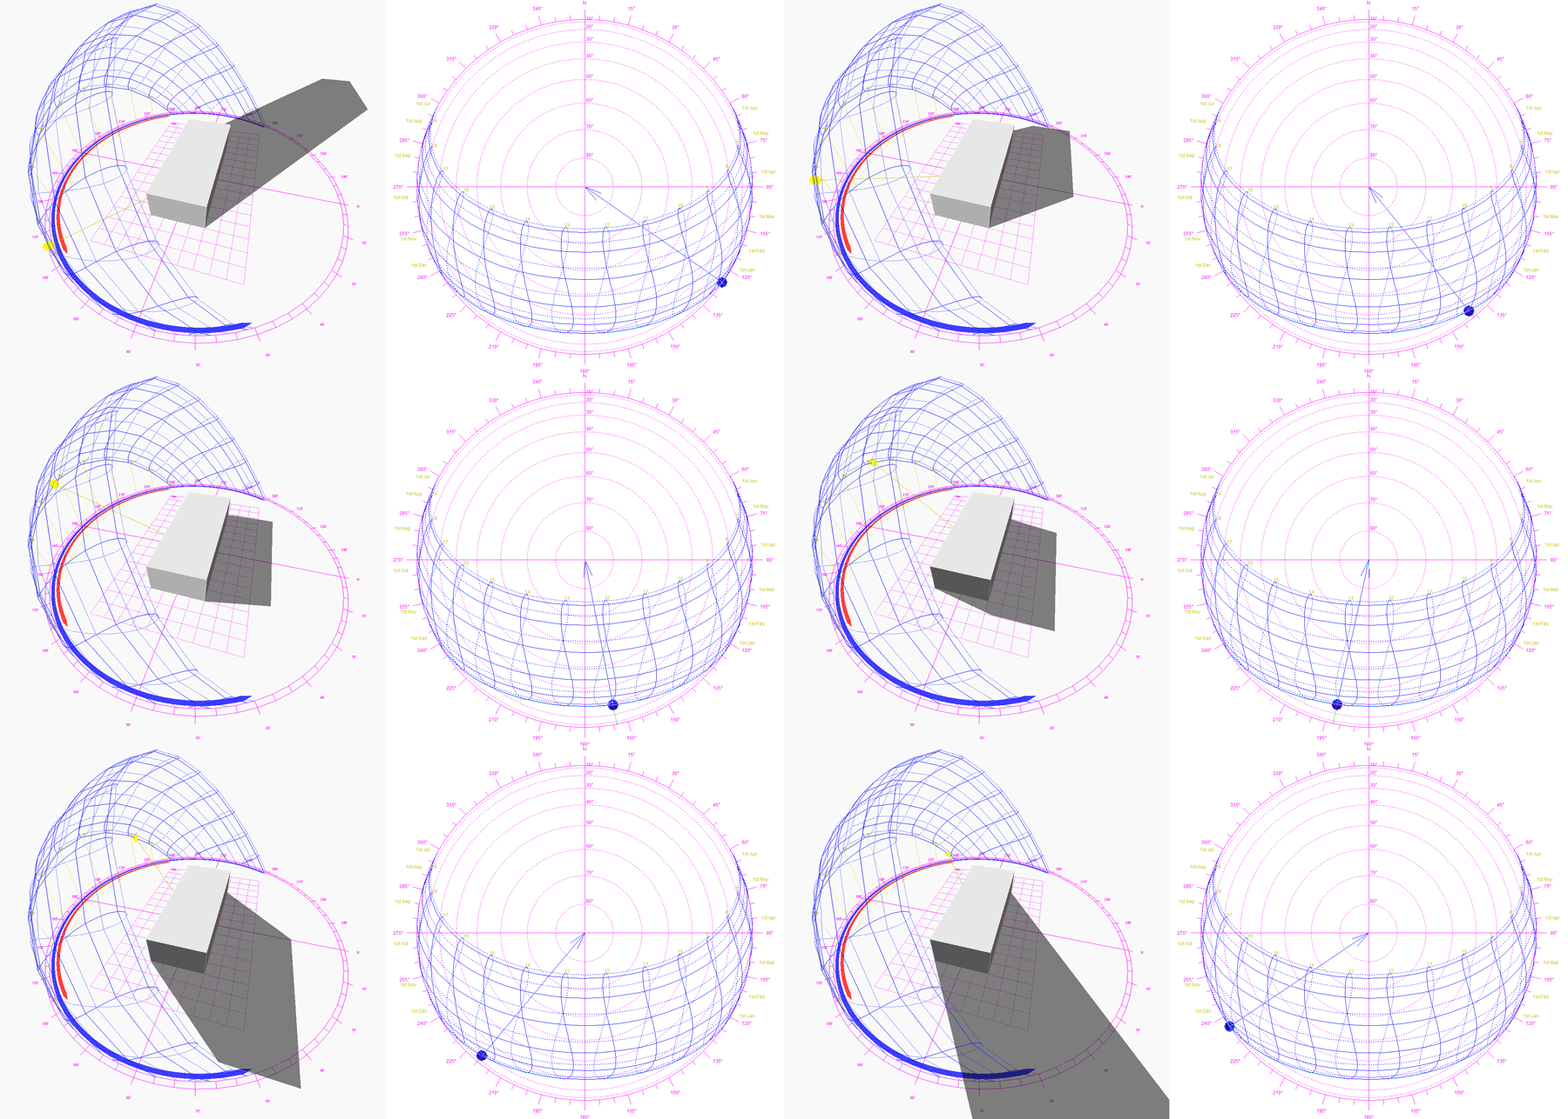
Winter — notice the low sun arc and long mid-day shadows.
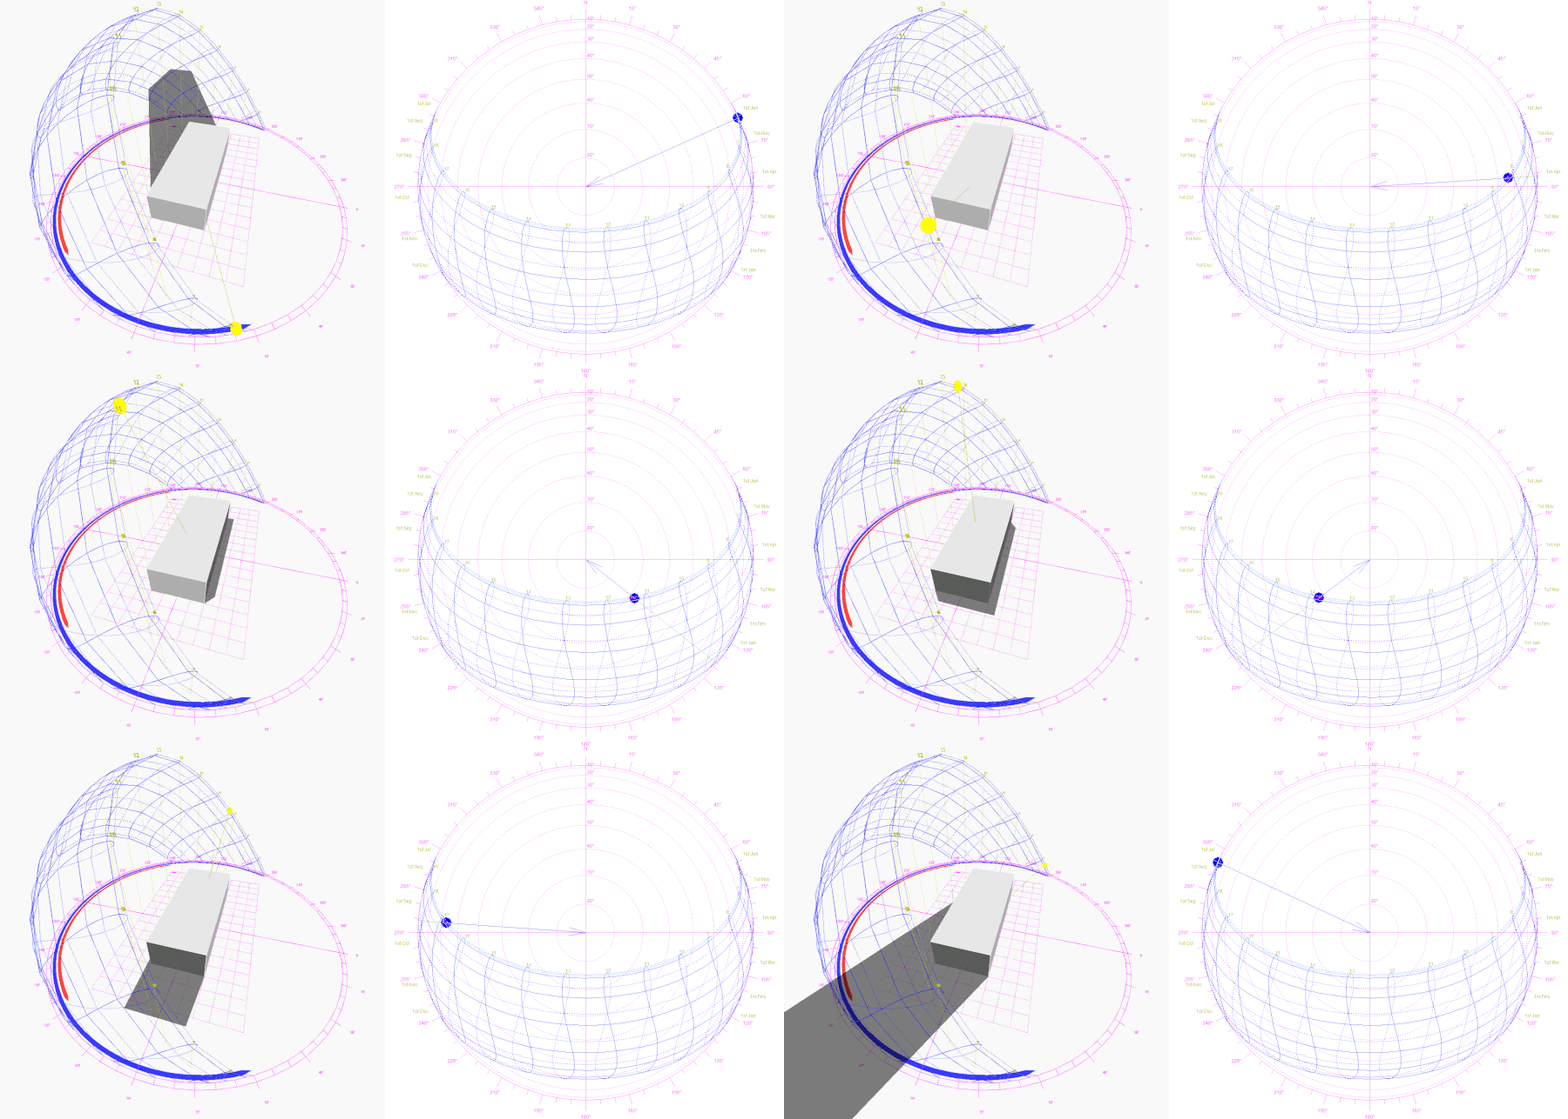
Summer — notice the high sun arc and short mid-day shadows.
Now, back to the NCARB References and shading devices
The following books are significant NCARB references for the topic of sun shading:
- Building Construction Illustrated Francis D.K. Ching John Wiley & Sons, 6th edition, 2020
- Green Building Illustrated Francis D.K. Ching and Ian M. Shapiro Wiley, 2014
- The Green Studio Handbook: Environmental Strategies for Schematic Design Alison G. Kwok and Walter Grondzik Routledge, 3rd edition, 2018
- Heating, Cooling, Lighting: Sustainable Design Strategies Towards Net Zero Architecture 5th edition
- Mechanical & Electrical Equipment for Buildings Walter T. Grondzik and Alison G. Kwok John Wiley & Sons, 12th edition (2014) and 13th edition (2019)
- Sun, Wind, and Light: Architectural Design Strategies G.Z. Brown and Mark DeKay John Wiley & Sons, 3rd edition, 2013
Here’s a summary of east and west-facing shading devices according to each NCARB reference, followed by commentary specifically from each publisher.
East and West Shading Devices — Summary
Use vertical fins:
- In a hot climate, slant fixed fins toward the north to block the hottest sun.
- In a cold climate, slant fixed fins toward the south to allow insolation of winter sun.
- Ideally, use movable fins that adjust to keep their broad sides facing the sun.
- Especially effective if views are undesirable.
Use overhangs:
- If desirable views are critical, then overhangs are the best option.
- If glare is a concern, then overhangs reflect glare up and away from internal spaces.
- Overhangs must extend beyond the sides of windows to shade adequately.
- Blocking all morning and afternoon sun is wildly impractical because of the overhang depth required.
Here’s what each NCARB reference has to say about east and west-facing shading devices. Note the outlier, Heating, Cooling, Lighting
East and West Shading Devices — Commentary
Building Construction Illustrated: Movable vertical fins.
- "Vertical louvers [shown as movable fins] are most effective for eastern or western exposures." pg. 1.22
- “East- and west-facing windows are sources of overheating and are difficult to shade effectively.” pg. 1.27
Green Building Illustrated: Vertical fins (fixed orthogonal fins shown). Possibly overhangs.
- "Vertical louvers [shown as fixed orthogonal fins] are most effective for eastern or western exposures." pg. 74
- “Required east and west overhang depths are much greater and, at 6 feet or more, can quickly become more extended than is feasible. An alternative are vertical louvers or fins, which offer more effective shading protection for eastern and western exposures.” pg. 74
- "Overhangs and awnings that face east, south, or west reduce solar gains in summer, and so reduce the energy required for air conditioning." pg. 74
The Green Studio Handbook: Vertical fins (fixed orthogonal fins shown).
- Figure 4.123 “Effective shading devices” shows vertical fins (no mention of slant) on the east, and presumably west, facade. pg. 115
Heating, Cooling, Lighting: Overhangs. Vertical fins slanted to the north in hot climates and slanted to the south in cold climates is an option, but not recommended.
- “Dynamic shading devices are especially appropriate on east and west windows because the sun is low in the sky when shining on the east and west windows” pg. 220-221
- “Slant [vertical fins] toward north in hot climates and south in cold climates. Restricts view significantly. Not recommended” pg. 221
- “For the east and west orientations, it is not possible to fully shade the summer sun with a fixed overhang” pg. 236
- “Since an overhang cannot fully shade east and west windows, it is assumed that vertical [orthogonal] fins would be a better option. In fact, vertical [orthogonal] fins shade no better than horizontal overhangs, and they obstruct the view much more.” pg. 236
- “vertical [orthogonal] fins that face directly east or west will allow too much sun penetration every day during the summer.” pg. 236
- “The myth that vertical fins work well on east and west windows can be convincingly busted by either looking at actual buildings that have fins or by building a model of the window with fins and testing it on a heliodon where ‘what you see is what you get.’” pg. 236-237
- “[Because of reflections] horizontal louvers [overhang] are better than vertical fins on east and west windows.” pg. 237
- “Vertical [orthogonal] fins are not good for shading east and west windows!” pg. 238
- “[if there are large buildings or trees shading the low sun] only a fixed but deep overhang will provide full shade with a view of the buildings or trees.” pg. 238
- “Since views of the ground and horizon are more important than the sky, use a horizontal overhang with a backup such as shutters.” pg. 240
- “Horizontal louvers [overhang] are better than vertical fins in part because they support quality daylighting.” pg. 240
- “If views directly to the east or west are not desirable, slanted vertical fins can be an alternative.” pg. 240
- “Slant the fins toward the northwest [on the west facade] if shading is required most of the year. Slant the fins toward the southwest [on the west facade] if winter sun is desired. Dynamic fins are better than fixed fins” pg. 240
- On the east and west facades, horizontal louvers are preferred over vertical fins, but neither works very well on those facades. Dynamic fins are much more effective than fixed fins on east and west facades." pg. 267
- Avoid vertical [orthogonal] fins on the east and west windows, since they work less well than horizontal louvers [overhang]." pg. 681
Mechanical & Electrical Equipment for Buildings: Vertical fins (fixed orthogonal and movable fins are shown). Overhangs for high sun angles is an option.
- "During the early design stages, it is best to orient spaces to face north or south to avoid the east/west sun's low angle. If this is not possible, vertical fins are an effective strategy for east and west orientation." pg. 178
- "On east- west-facing windows, a horizontal overhang is somewhat effective when the sun is at high positions in the sky but is not effective at low-altitude angles." pg. 178
Sun, Wind, and Light: Vertical fins, if they are perpendicular to the sun. Overhangs for temperate summers & tropical latitudes is an option. Egg crates are an option.
- “During the summer at temperate latitudes, or year-round at tropical latitudes, the sun is high enough in the sky for much of the day that horizontal overhead shading devices are more effective at shading outdoor space than vertical ones [fins]…However, in the morning or afternoon, shading elements in the vertical plane [fins] are more effective at blocking low-angle sun.”pg. 244
- “Vertical shades [fins] are effective when the sun is low and the broad side of the vertical elements faces the sun [slanted].” pg. 248
- “Egg crates combine the advantages of both horizontal and vertical shades and are particularly effective on facades that do not face the equator [east, west, and north].” pg. 248
Solar shading is a broad and complex topic, but an important strategy for limiting passive solar heat gain and maintaining thermal comfort. Overall these concepts fill several chapters in the NCARB references, much of which is beyond the scope of the ARE 5.0. But, with CLARE study cards and articles like The Principles of Solar Shading Devices, and Fundamentals of Solar Altitude, you’ll understand the dynamics of sun angles and orientation, and be able to respond to any scenario with an effective shading strategy.
Rift sawn or quarter sawn? It depends.

Depending on who's talking, the meaning of rift sawn and quarter sawn is quite different. Both terms refer to log cutting methods AND the boards those methods produce. Let's sort it out.
Project Planning & Design
Section 3 — Building Systems, Materials, & Assemblies
Objective 3.4 — Determine materials and assemblies to meet programmatic, budgetary, and regulatory requirements
Wood — Log Cutting vs. Board Identification
Log Cutting
There’s a lot more on log cutting methods and board characteristics in the CLARE app, but this particularly esoteric slice of the subject generates confusion among ARE candidates and experts alike. If you're not familiar with the terminology controversy, here's just one example of a CYA paragraph.
To a sawyer, rift sawn and quarter sawn describe two different log-cutting methods.
A rift sawn log is first cut into quarters lengthwise. Each quarter is then rotated between cuts, and boards are cut radially, perpendicular to the annular growth rings. Rift, is derived from the word “rive,” meaning split, e.g., to split a short log radially to make shingles.
A quarter sawn log is also cut into quarters first. But, boards are then (usually) cut at 45° to the flat faces of the quarters.
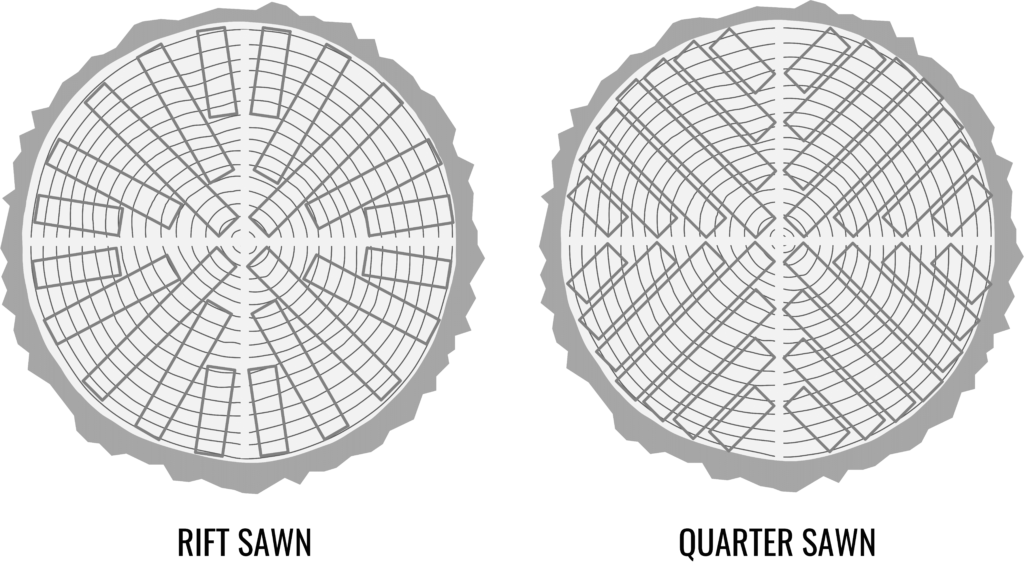
Board Identification
To an architect, carpenter, or layman, “rift sawn” and “quarter sawn” describes the angle of the annular growth rings (end grain) of the boards produced by a log cutting method.
Because you’re an architect, not a sawyer, here’s what you need to know about the terminology and end grain angle:
Boards with end grain aligned at an angle between 30° and 60° to the broad face are described as “rift sawn.” The grain pattern is parallel on all four sides; broad faces and narrow edges. Low log yield makes these boards the most expensive.
Boards with end grain aligned at an angle between 60° and 90° to the broad face are described as “quarter sawn.” The grain pattern is uniformly parallel and closely spaced on the broad faces, but on the narrow edges the grain pattern is irregular.
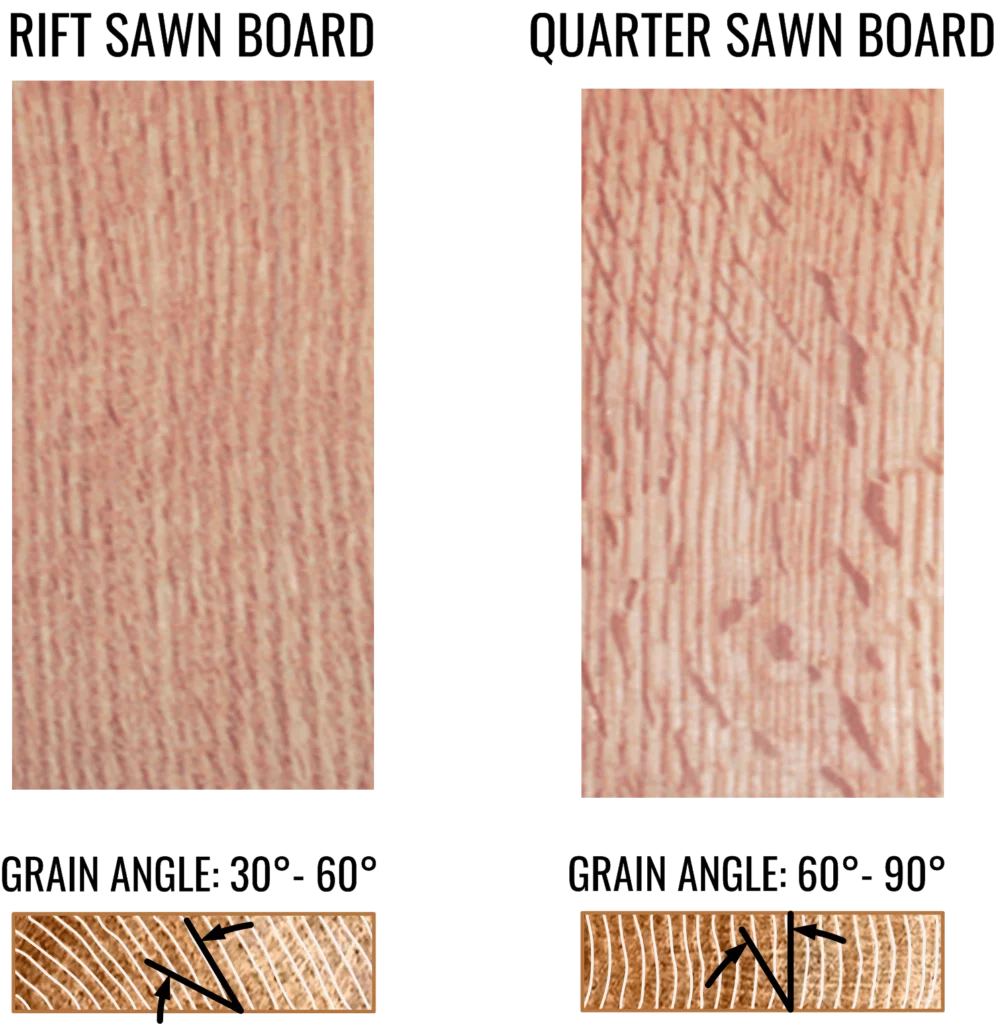
In short:
- A rift sawn log yields all "quarter sawn" boards.
- A quarter sawn log yields both "rift sawn" boards and "quarter sawn" boards.
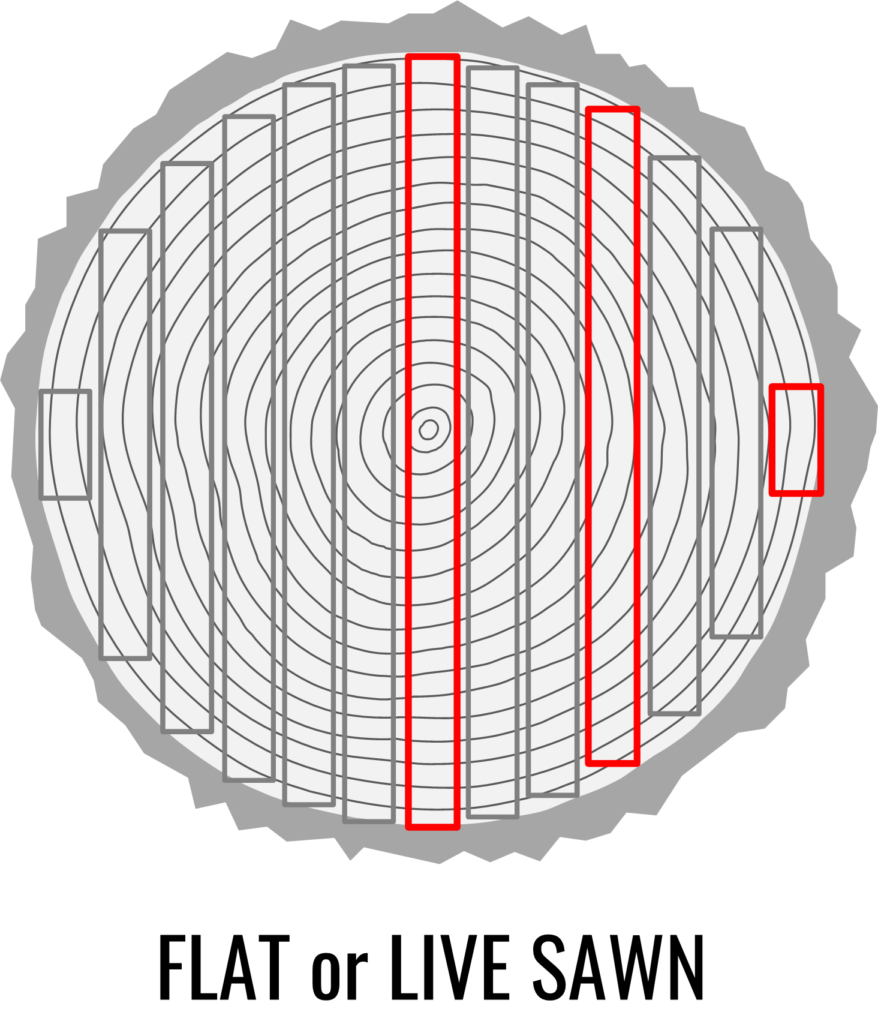
Interestingly, a flat (or live) sawn log yields some "plain sawn" boards, and boards with "rift sawn" and "quarter sawn" characteristics. Of course, each type of board has its own cost, stability, and visual characteristics. All of which you’ll find in the CLARE article: Wood - Characteristics of Logs vs. Boards. And don’t forget about veneer slicing methods and grain patterns!
ARE 5.0 Acoustics Formula — Frequency vs. Wavelength
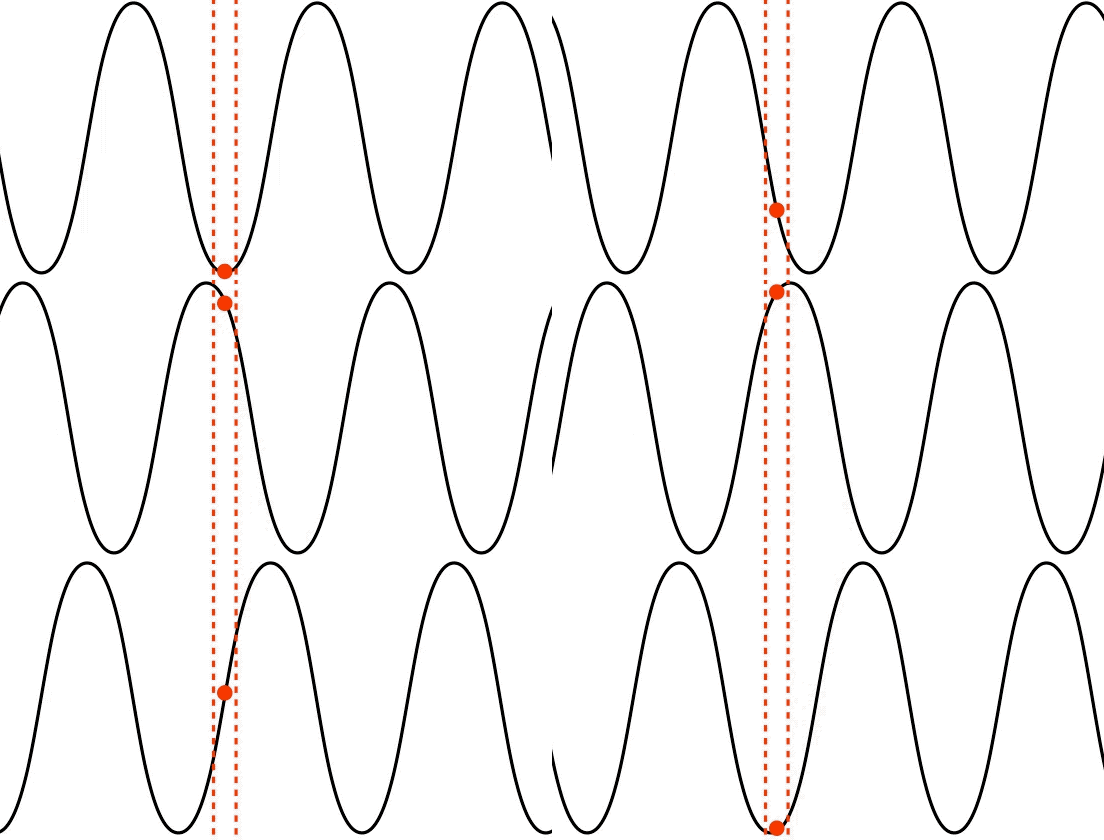
The wavelength formula is among the four ARE acoustics formulas listed in the NCARB ARE Guidelines (page 126). Let's check out the relationship between wavelength and frequency.
Project Planning & Design
Section 3 — Building Systems, Materials, & Assemblies
Objective 3.3 — Determine special systems such as acoustics
Excerpted from the CLARE article, Acoustics and Design Strategy.
Through design, we can influence the sounds we want to hear and eliminate those we don’t. But first, we need to understand sound. Sound energy travels through a medium (solid, liquid, or gas) in waves. For example, airborne sound waves, like those produced by speech or a car horn, cause air molecules to oscillate in the direction of the sound, which results in an audible pressure wave. To better understand what's happening, let's look at the components of sound.
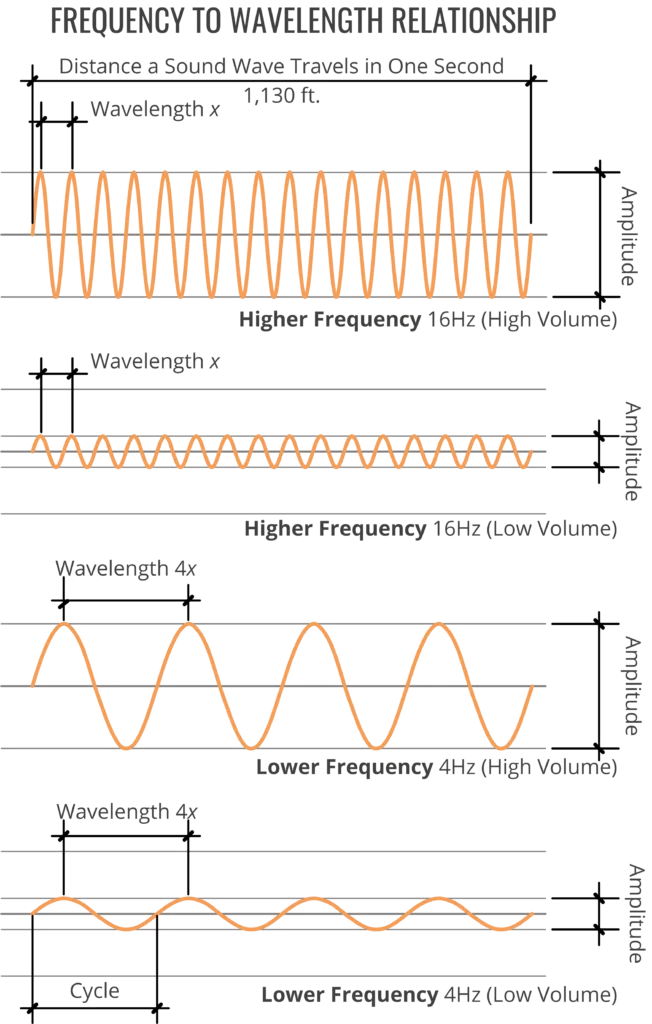
Wavelength is the distance between two corresponding points on a waveform, measured in feet.
Frequency, sometimes called pitch, is the number of wavelengths that repeat in one second, measured in Hertz (Hz). Humans can hear frequencies within a range of about 20Hz to 20,000Hz. A high frequency corresponds to a short wavelength, and a low frequency corresponds to a long wavelength.
Amplitude, sometimes called loudness or volume, is what we perceive as the relative intensity of the sound waves, measured in decibels (dB).
Velocity (speed) of sound waves is more or less constant, measured as the distance (in feet) traveled in one second (fps).Interestingly, wavelength and frequency have an inverse relationship, i.e., as one gets larger, the other gets smaller. Therefore, the ARE acoustics formula is Wavelength (λ) = Velocity (c)/Frequency (f)
λ = c / f
Much more in the CLARE app.
Because proper acoustic design is critical, understanding the characteristics of sound helps you, the architect, make informed design decisions. It's a complex science. However, for the design of most spaces, an understanding of acoustics fundamentals allows you to minimize the adverse effects of noise, enhance the effects of desirable sound, and maximize the well-being of the occupants. While physics makes no distinction between "sound" and "noise," the latter can be characterized as sound that carries no useful information to the receiver and is perceived as unpleasant. So, of course, it’s incumbent on architects to control noise. Not just because it's annoying, it can be unhealthy. In a work environment, if it’s loud enough for long enough, it’s dangerous.
ARE 5.0 Practice Exams – How To Use Them Wisely.

There’s a ton of ARE 5.0 practice exams out there. But, a solid test question is hard to write. With the help of psychometricians, NCARB relies on an army of volunteers to write, review, revise, and test ARE exam questions before they’re unleashed on candidates. The fact that candidates still have issues with NCARB’s exam questions is evidence of the writing challenge. I’d argue that no third-party ARE 5.0 practice exam questions have been as thoroughly vetted, and forget about accurate levels of cognitive complexity. So proceed with caution. Research supporting an increase in exam scores after taking multiple practice tests is measured using actual exams for practice. NCARB does not release deprecated exam forms, but having one practice exam for each division is definitely helpful.
When we talk about the value of an ARE 5.0 practice exam, passing or failing does not indicate your exam readiness, nor is it about getting the right answer. The value is gaining insight into potential ARE 5.0 exam topics and assessing how well you understand them. And to determine whether you fully grasp a concept, you'll more than likely have to do some additional homework.
ARE Practice Test Questions
Let’s examine just one of the many practice questions that have vexed ARE candidates lately. Here’s a screen capture from a practice test promotional video (by a well-known company). Remember, this is not to bash the writer. Again, it’s not easy. Take a shot at answering this question?
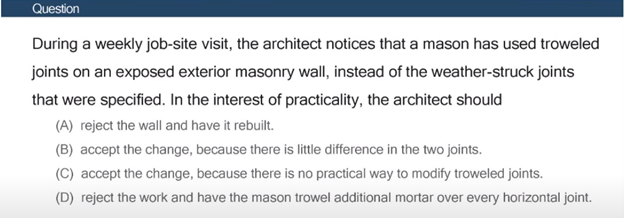
(Scroll for the answer)
Below is their answer, (A), along with a few mortar joint examples.
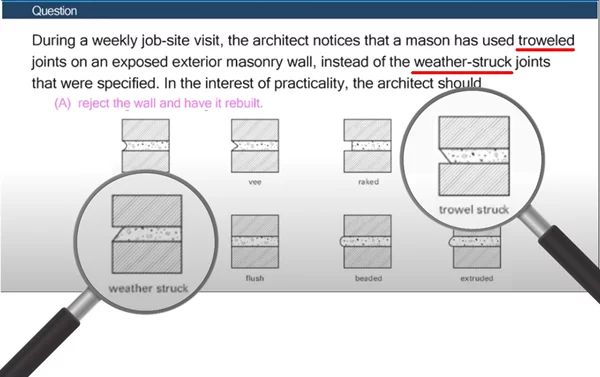
Rationale
In the video, here’s how they justify the answer:
Eliminate answer choices C and B right off the bat:
(C) accept the change, because there is no practical way to modify troweled joints.
Rationale: The architect shouldn’t accept inferior work.
(B) accept the change, because there is little difference in the two joints.
Rationale: There’s clearly a difference [in weather resistance] between the two joints.
(We’ll get to the “two joints” in a minute.)
That leaves us with answer choices D, or A.
(D) reject the work and have the mason trowel additional mortar over every horizontal joint.
Rationale: While there is some “practicality” to this solution, it’s not enough to justify accepting inferior work.
According to the video, (A) is the correct answer.
(A) reject the wall and have it rebuilt.
Rationale: Even though it doesn’t seem “practical,” this is the only/most correct answer [because the wall will fail prematurely, the architect should not accept inferior work or the increased liability, the mason’s work doesn’t match the construction documents or meet the owner’s expectations].
The Practice Test Problem
If you picked the right answer, congratulations. If not (or if you just couldn’t choose), don't get tangled up trying to justify one answer choice over another. The answer choices are irrelevant because the question itself is flawed.
Using accurate terminology in ARE 5.0 practice exam questions is important. In this case, it’s vital. So, this isn’t just an exercise in semantics and pettiness. Choosing the “correct” answer hinges on knowing the difference between “troweled” and “weather-struck,” and how well they protect an “exposed exterior masonry wall” from the damage of the freeze-thaw process.
“a mason has used troweled joints…instead of the weather-struck joints that were specified.”
Remember their rationale for why answer choice B is wrong?
“There’s clearly a difference between the two joints.”
The problem is that “troweled” and “weather-struck” are not two different kinds of joints.
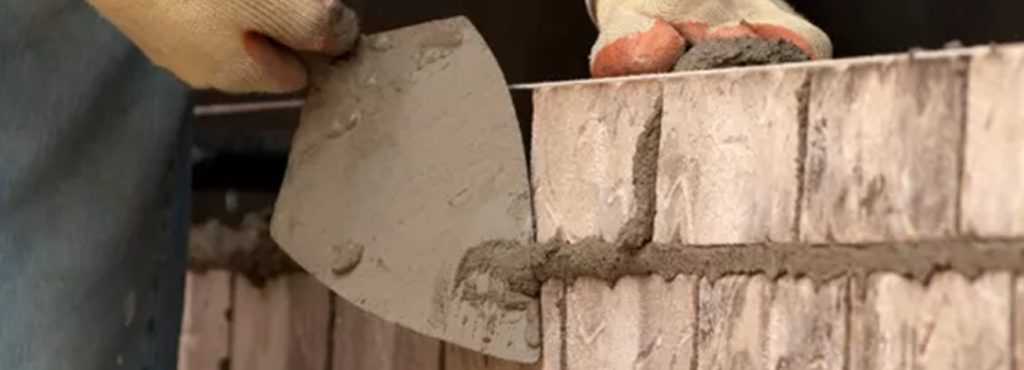
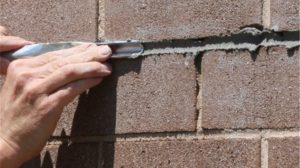
“Troweled” is a method of making various types of joints, by using a trowel, one of which is a “weather-struck” joint. Look at the image atop this blog post. The mason is using a trowel to make a weather-struck joint.
They’re comparing apples to oranges.
The Explanation
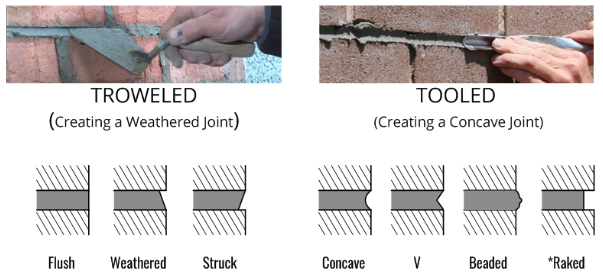
There’s a lot going on here, so let’s break it down. Generally, there are two types of mortar joints; troweled, and tooled.
In a troweled joint, the mortar is shaped by cutting off the excess with the edge of a trowel. Note that the joints the rationale calls “trowel struck,” “flush,” and "weather-struck” are formed using a trowel.
In a tooled joint, a special tool is used to compress and shape the mortar in the joint, which makes the joint more weather resistant.
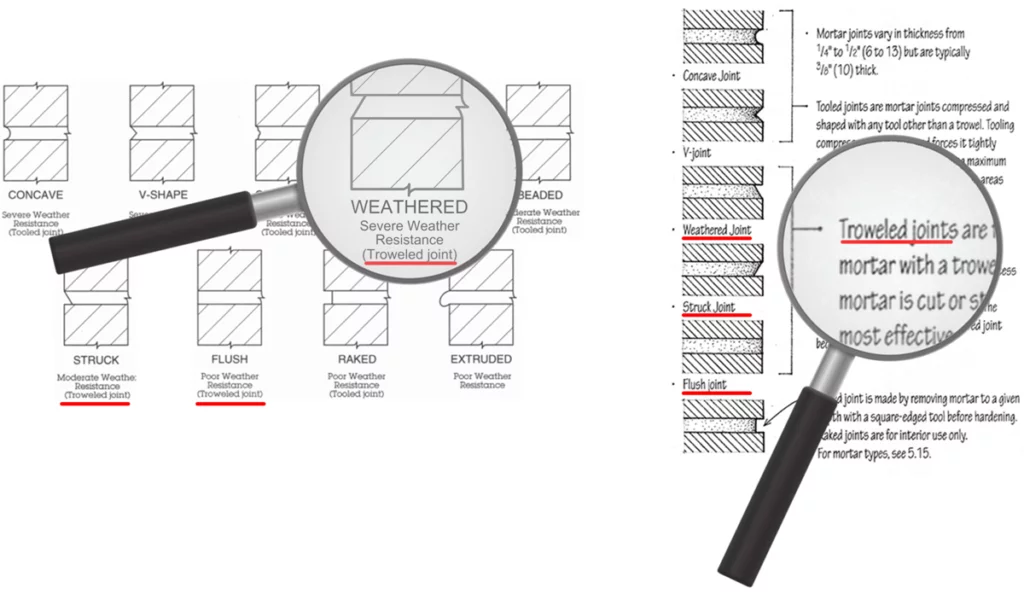
Now, let’s take a closer look at their rationale. Notice the “trowel struck” and the “weather struck” joints. They show these two joints to illustrate that one joint sheds water better than the other, which is true.
The thing is, the construction industry uses different terminology to describe joints, how they’re formed, and their weather resistance. For example, what their rationale image calls “trowel struck” (below left) is typically called, “struck.” On the right are just a few examples from a Google search.

Their use of the term “trowel struck” muddies the waters. But that’s not the most troubling part. Again, the question states:
“a mason has used troweled joints…instead of the weather-struck joints that were specified.”
But, a “weather-struck joint” is a type of "troweled joint!"
This is a long way of saying, because the terminology isn’t quite right, it’s impossible to match a correct answer choice to the question.
So, is this ARE practice test question useless? If you are using it to predict your performance on ARE 5.0, yes. If you consider this practice test question to be a “thing to know” and then research it, the answer is no. By investigating the topic, I got a quick refresher on joint types, their effectiveness, and much more. And that’s the point. Think of ARE 5.0 practice exams as a guide for topics you should understand. Then study those topics.
Your practice test score is not a measure of your readiness to test. If you insist on taking ARE 5.0 practice exams, other than NCARBs, keep in mind that those questions don’t get nearly the same scrutiny as actual ARE test questions, and this example is no different. Remember, it only takes one word to derail what might otherwise be a solid ARE practice question. As I said, they’re hard to write.
The Architect May Have Liability Too
PcM - Section 1, Objective 3 (Architect liability)
CE - Section 2, Objective 1 (Architect liability)
This question comes up regularly.
On a routine site visit an architect witnesses an unsafe condition. What to do?
I often hear, “Say nothing, because of the architect’s potential exposure to liability.” Seems like a safe approach, but is this really what it’s come to? Not only is the “say nothing” response morally suspect, it’s arguably a violation of more than one standard in the architect’s Code of Ethics and Professional Conduct. Furthermore, according to Law for Architects: What You Need to Know (an NCARB reference for ARE 5.0), “…you can still be held liable if you actually observe or know about a dangerous condition or practice at a jobsite and fail to warn about it, in the event that condition or practice later causes an injury…”
The architect is required to act reasonably. Of course, without some additional context, it’s impossible to know what a “reasonable person” might do. But the answer is clearly not, “nothing.”
Here are some examples.
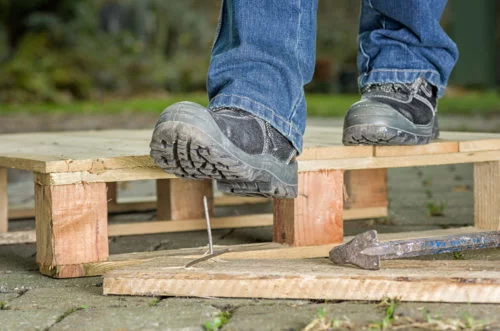
Say there’s a board laying on the ground. A nail is sticking out where someone could step on it. A relatively minor concern, right? It happens all the time.
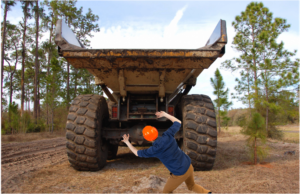
But, imagine an extreme scenario in which someone is in imminent danger; a falling beam, or a truck backing up toward a worker. “Say nothing”? Really? I hope somebody would at least give me a “heads up."

The scenario for an ARE 5.0 question is likely to be somewhere between these two extremes. Say, improperly stacked material is at risk of falling over on the job site. It’s true that the architect should not advise the contractor regarding means and methods, or workplace safety. But a reasonable action is to tell the contractor that the material is about to fall over, whereas suggesting that the contractor secure it with duct tape is not. Inform, don’t advise.
While the architect is not obligated to look for unsafe conditions if one is found during a site visit (the execution of the architect’s services), the architect is obligated to do something, and that includes notifying the contractor, the owner, or a public official who deals with safety issues. So, if someone gets hurt and it comes out that you, the architect, were aware of the danger and did nothing, you’re now exposed to a whole new liability. And you don’t want that.
A Familiar ARE 5.0 Debate – AIA A201
AIA A201-2017™, General Conditions of the Contract for Construction.
ARE Division: CE - Section 4, Objective 4.1
Question: The punch list. Who provides it?
The Short Answer: The contractor.
Why? Because it says so in § 9.8.2 AIA A201-2017™, General Conditions of the Contract for Construction.
The Long Answer:
The actual practice of architecture often diverges from how AIA A201-2017 says it’s supposed to work. For answering exam questions, this is a recipe for the confusion that is often reinforced by those who should know better.
Just so we’re all working from the same set of facts, AIA A201-2017 § 9.8.2 says:
“When the Contractor considers that the Work…is substantially complete, the Contractor shall prepare and submit to the Architect a comprehensive list of items to be completed or corrected prior to final payment…”
So why is this up for debate? Misinformation. Here are just two examples:
1. In Law for Architects: What You Need to Know (an NCARB reference for the ARE, BTW), on page 35, it says: "Once you have determined that the project is substantially complete, you and your client should generate a punch list for the contractor."

WTF!
2. In the old ARE 5.0 NCARB Handbook on page 149, sample item 7 offered a scenario where an architect has clearly provided a punch list:
"The architect inspected the work and prepared the following list of incomplete work."
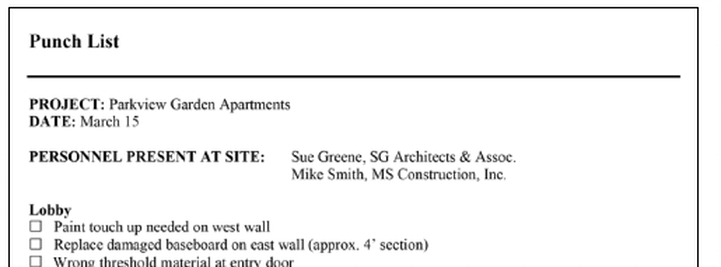
A third reason? Maybe in your office, it’s customary for the architect to provide the punch list.
Yes, the architect’s responsibilities include reviewing the punch list and providing input, but it’s the contractor’s job to generate it. Here’s the point. On ARE 5.0, NCARB wants you to answer questions based on what it says in the AIA contracts, the way the AIA thinks architecture is supposed to work.
AIA Document A201-2017. Spoiler. It’s the Owner.
Division: Construction and Evaluation
Section 3: Administrative Procedures & Protocols (32-38%)
Objective 4: Evaluate responses to non-conformance with contract documents
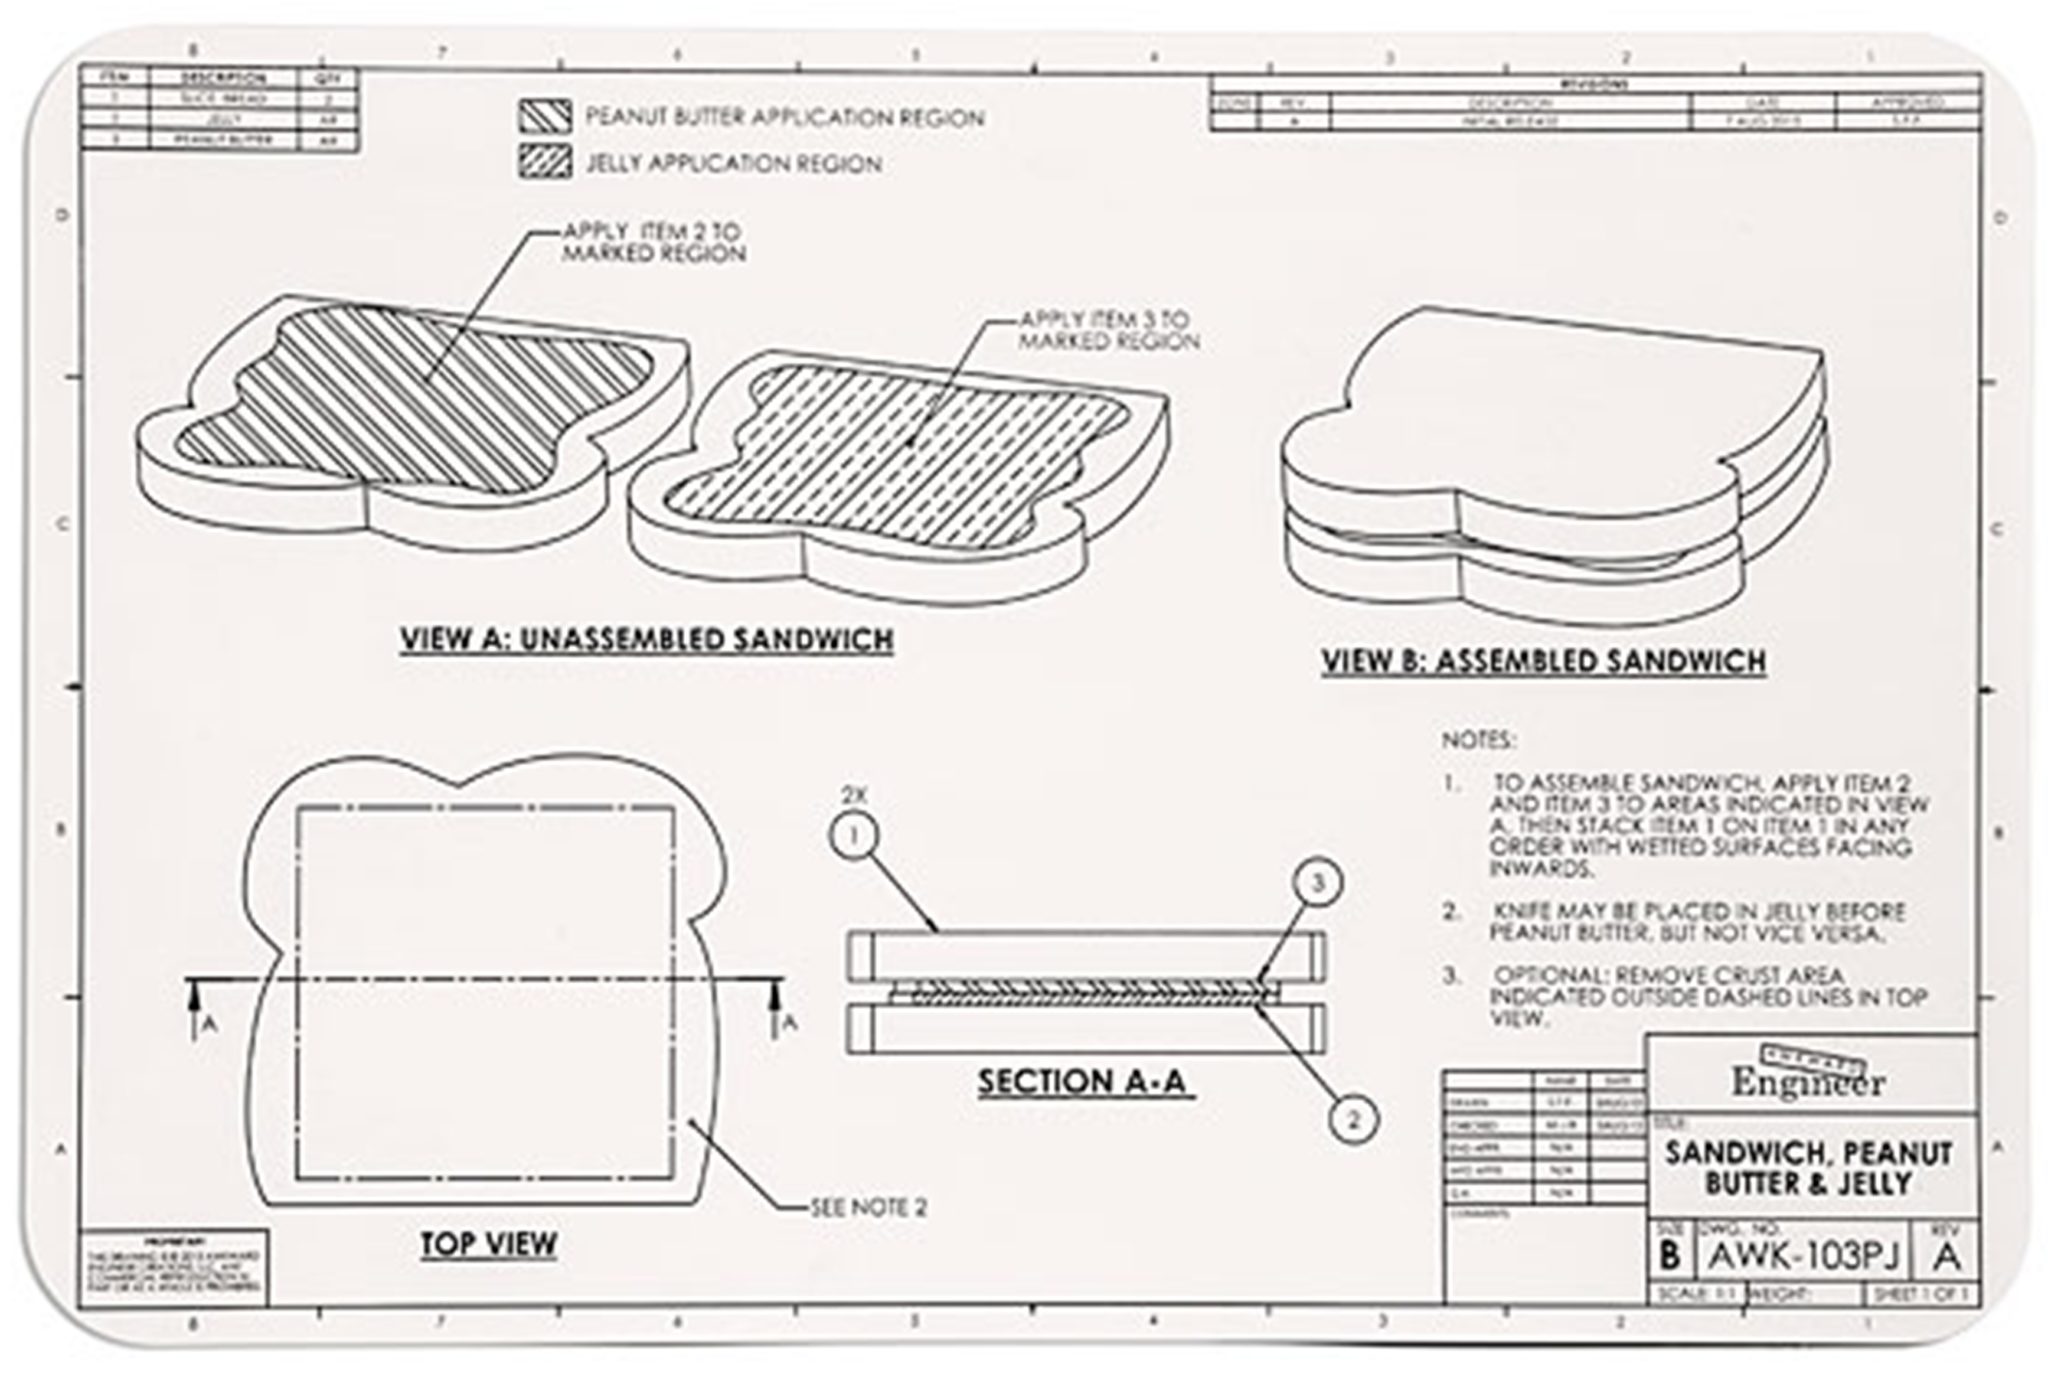
During a routine inspection to determine if the sandwich is substantially complete. The architect suspects that the contractor used chunky peanut butter instead of smooth as required by the specifications. In accordance with AIA Document A201-2017, General Conditions of the Contract for Construction, the architect requests to see the peanut butter. The contractor disassembles the sandwich, which exposes smooth peanut butter.
Who pays for uncovering the peanut butter and reassembling the sandwich?
The owner
According to AIA Document A201-2017, Article 12, Uncovering and Correction of Work, because the correct type of peanut butter was used, the contractor is entitled to an appropriate adjustment of the Contract Sum and Contract Time.
"Section 12.1.2 If a portion of the Work has been covered that the architect has not specifically requested to examine prior to its being covered, the Architect may request to see such Work and it shall be uncovered by the Contractor. If such Work is in accordance with the Contract Documents, the Contractor shall be entitled to an equitable adjustment to the Contract Sum and Contract Time as may be appropriate."
However, if the work was not in accordance with the contract documents, the contractor is responsible for the cost of uncovering and correcting the Work.
Section 12.1.2 (continued) "If such Work is not in accordance with the Contract Documents, the costs of uncovering the Work, and the cost of correction, shall be at the Contractor's expense."
While the architect’s reputation pays a steep price for the mistake (and for requesting smooth peanut butter when everyone knows that chunky is superior) the cost of uncovering the peanut butter and reassembling the sandwich is at the owner’s expense.
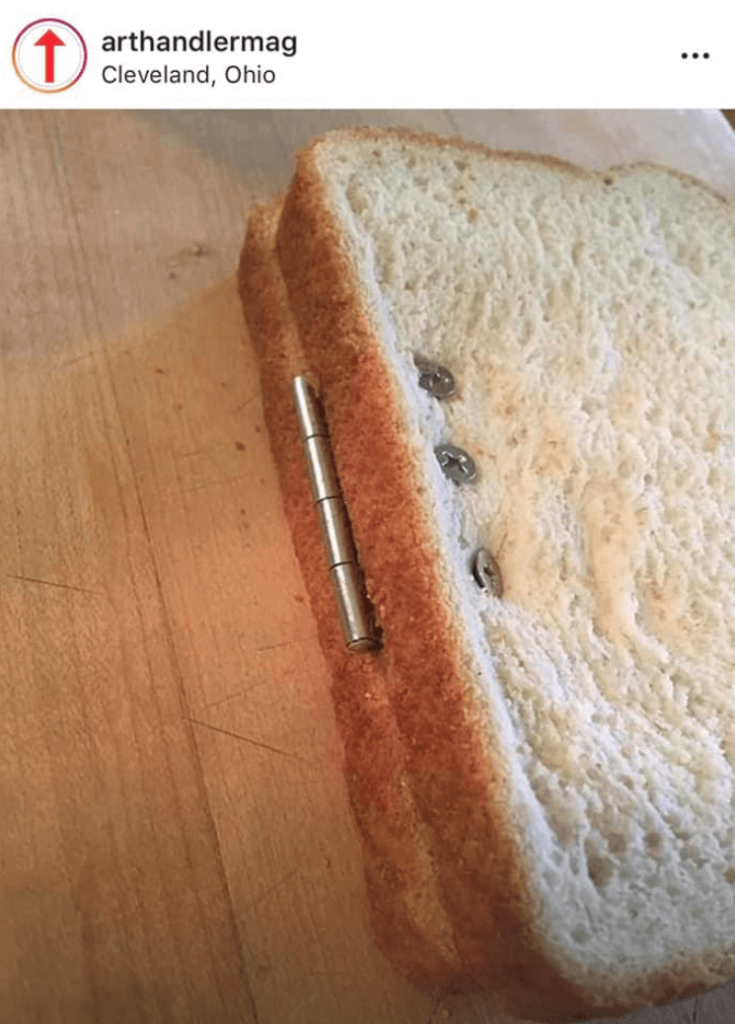
A perfectly impractical solution provided by S Surface via The ARE Facebook Group
Read more about A201-2017:
Statute of Repose vs. Statute of Limitations on the ARE 5.0

WTF is the difference? Inquiring minds want to know.
There’s a lot of confusion regarding the Statute of Repose vs. the Statute of Limitations. One reason is each state sets its own limitations regarding the start date, the duration, and the end date. Furthermore, these change over time as each state sets a new precedent and updates the law. There is no absolute time limit for each statute, they both generally vary from 1 to 10 years depending on the state, and there isn’t one specific date the clock starts ticking on the repose period. Although each statute’s purpose is consistent, the interpretations, types of claims, and rules vary across the country. For example, New York does not have a statute of repose for construction, and Vermont’s only applies to condominiums.
Statute of Repose
Statute of Repose is a time limit imposed by law (time varies by state) within which a claim/cause of action can be filed against the person(s) who performed the services (architect, designer, contractor). It starts on a specified date, usually the date of substantial completion, date of occupancy, or receipt of the Title. Usually, the time limit is ten years, but it varies significantly among states. If both parties agree, they can specify an alternate time limit for either statute in their contract. However, the agreed-upon statute is overruled if the court considers the time limit unreasonable.
For example, if a client discovers a defect in the work and wants to sue for damages, they can bring a suit within the statute of repose - let’s say ten years. If something happens in year eleven, it is too late, a suit cannot be brought. The time is up.
Statute of Limitations
Statute of Limitations is a time limit imposed by law that falls within the statute of repose. A claim/cause of action can be filed against the person(s) who performed the services (architect, designer, contractor). The time starts when an occurrence is discovered or should have been discovered or when the damage occurs. The state determines the time limit and is shorter than the statute of repose – 4, 6, 8 years. The statute of limitations expires on the same date as the statute of repose if no claim is filed.
For example, suppose the statute of repose is ten years, and the statute of limitations is six years. In that case, if damage occurs or is discovered in year five, five years remain, not six (the duration of the statute of limitations), in which to file a claim before the statute of repose ends. If the statute of limitations is nine years, and the damage occurs or is discovered in year eight, one year remains to file a claim before the statute of repose expires. The legal battle may extend beyond the statute of repose once a lawsuit is filed.
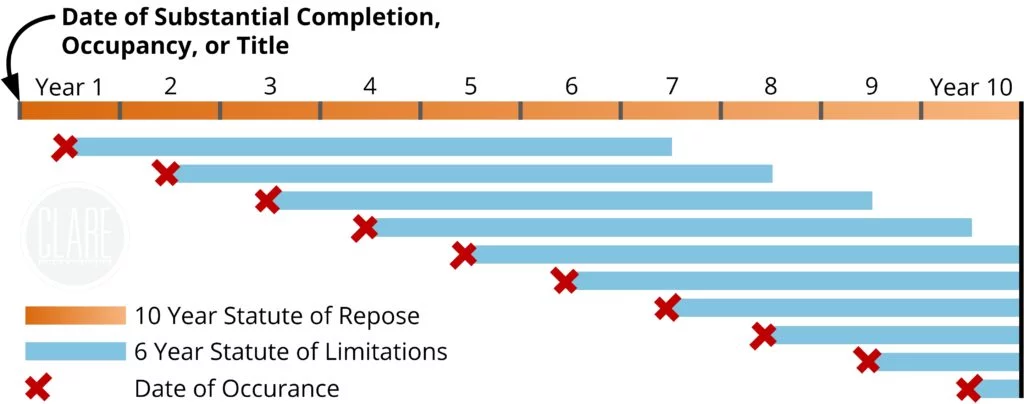
In Simpler Terms
Statute of Repose starts at a predetermined time–substantial completion, certificate of occupancy, receipt of the Title (varies by state).
Statute of Limitations starts at the occurrence of an injury or damage or the time it is discovered by the claimant.
Let's Break Down the History
In the mid-1960s, architects/contractors were liable for the life of the building because a statute of repose did not exist. They put pressure on states to adopt a time limit on their liability. Slowly, states began to enact their own laws, though they were vague and varied more significantly than today. Therefore, the AIA adopted provisions limiting the architect’s exposure to liability, imposing their own statute of limitations and repose in the contracts' 1987 and 1997 editions. Owners complained that the wording in the contracts limited their remedies and unfairly benefitted the architect. In 2007, enough states had adopted a statute and the AIA dropped the provisions.
Since the 2007 edition, AIA contracts have deferred to the limits established by applicable law. When discussing the statute of limitations vs. the statute of repose, look to the state to understand the applicable limits. Although you can modify the contract and set agreed-upon limits that differ from the state, a court could choose to ignore those contract limits if it deems them unreasonable.
Let's Break Down the Contracts
In AIA B101-2017, Standard Form of Agreement Between Owner and Architect, Article 8.1.1, the wording still tries to limit the statute of repose to 10 years, which is already the maximum in most states. In essence, the wording is there as a “just in case” scenario and may not hold up in court. Additionally, Article 8.1.1 refers to Substantial Completion as the date that starts the clock on the statute of repose. However, some states use the date of occupancy or the receipt of title. It is up to the court to determine if they will uphold the agreed-upon start date in the contract.
The same language appears in A201-2017, General Conditions of the Contract for Construction, Article 15.1.2. Additionally, the bold text in Article 15.4.1.1 defers to the laws in the state where a claim would be filed. A101-2017 Standard Form of Agreement between Owner and Contractor, Article 6.2 refers back to A201 and adds that a claim would be resolved in the court having jurisdiction.
B101-2017 Standard Form of Agreement between Owner and Architect
§ 8.1 General
“§ 8.1.1 The Owner and Architect shall commence all claims and causes of action against the other and arising out of or related to this Agreement, whether in contract, tort, or otherwise, in accordance with the requirements of the binding dispute resolution method selected in this Agreement and within the period specified by applicable law, but in any case not more than 10 years after the date of Substantial Completion of the Work. The Owner and Architect waive all claims and causes of action not commenced in accordance with this Section 8.1.1.”
A201-2017 General Conditions of the contract for construction
Ҥ 15.1.2 Time Limits on Claims
The Owner and Contractor shall commence all Claims and causes of action against the other and arising out of or related to the Contract, whether in contract, tort, breach of warranty or otherwise, in accordance with the requirements of the binding dispute resolution method selected in the Agreement and within the period specified by applicable law, but in any case not more than 10 years after the date of Substantial Completion of the Work. The Owner and Contractor waive all Claims and causes of action not commenced in accordance with this Section 15.1.2.”
Ҥ 15.4.1.1
A demand for arbitration shall be made no earlier than concurrently with the filing of a request for mediation, but in no event shall it be made after the date when the institution of legal or equitable proceedings based on the Claim would be barred by the applicable statute of limitations. For statute of limitations purposes, receipt of a written demand for arbitration by the person or entity administering the arbitration shall constitute the institution of legal or equitable proceedings based on the Claim.”
A101-2017 Standard Form of Agreement between Owner and Contractor
Ҥ 6.2 Binding Dispute Resolution
For any Claim subject to, but not resolved by, mediation pursuant to Section 15.3 Article 15 of AIA Document A201–2007, A201–2017, the method of binding dispute resolution shall be as follows:
(Select one)
Arbitration pursuant to Section 15.4 of AIA Document A201–2017
Litigation in a court of competent jurisdiction
Other (Specify)
If the Owner and Contractor do not select a method of binding dispute resolution or do not subsequently agree in writing to a binding dispute resolution method other than litigation, Claims will be resolved by litigation in a court of competent jurisdiction.”
One More Thing
As architects, the most important takeaway from the Statute of Repose vs. Statute of Limitations is understanding how far in the future you can be sued and how long you should maintain PLI on a project. Unfortunately, maintaining insurability can require an Extended Reporting Period (ERP) or Tails Coverage policy– you can learn more about this and more when you join CLARE.
Joints in Architecture: Understanding the Terminology and Differences for ARE 5.0
PDD — Section 1, Objective 1.1 or Section 2, Objective 2.3
Terminology in architecture and construction carries a lot of weight. Subtle distinctions in meaning make a big difference among common materials, assemblies, and practices, and using the appropriate terms (especially when writing test questions) is essential.
Sill plate vs. sole plate, rift sawn vs. quarter sawn, vapor barrier vs. vapor retarder, to name a few.
The terminology used in one practice test question highlights just how challenging it is to craft a good one. The topic is mortar joints—specifically, the purpose of different joints, when they’re used, and how they’re made, which is crucial for ARE test prep.
Unfortunately, the question refers to “troweled joints” and “weather-struck joints” as two types of mortar joints, when in fact, “troweled” is a method for making various types of joints, one of which is “weather struck” [weathered]. Semantics aside, here’s what you need to know.
Two Joints
There are (generally) two ways to make a mortar joint; troweling and tooling. These methods are used to produce different joint profiles, each with unique advantages, disadvantages, and visual characteristics.
Troweled Joint
The mason uses a trowel to form the profile of the mortar joint. Because the excess mortar is simply scraped off, the surface of the remaining mortar is rough, porous, and less effective at preventing water penetration. Joint profiles include:
- Flush: Often used when the surface needs plastering and final finishing.
- Weathered: The mortar profile helps to shed water and emphasize the horizontal joints.
- Struck: Not recommended for exterior use. The mortar profile allows water to collect on the top face of the brick.
Tooled Joint
The mason uses a specially shaped tool to smooth the surface and compress the mortar into the joint, making the mortar itself more water-resistant.* Joint profiles include:
- Concave: The most common profile. It is considered the best joint for preventing water penetration.
- V-shaped: The tooling creates a line in the center which emphasizes the joint.
- Beaded (round or square): An ornamental bead highlights the joint. The surface of the joint is proud of the brick face, which can trap water and negate the water resistance provided by the tooling.
- *Raked: Not recommended for exterior use. Although a tool is used to scrape out mortar to the desired depth, the surface of the mortar is not smoothed and compressed, making it less water-resistant. Additionally, the profile of the joint allows water to collect on the top face of the brick.
Selecting the appropriate joint profile requires balancing effectiveness and esthetics (mostly effectiveness). For a little more insight into joint tooling, this short video is 90 seconds well spent.
Nuts and bolts of moment and torque: What you need to know for ARE 5.0

PDD — Section 1, Objective 1.3
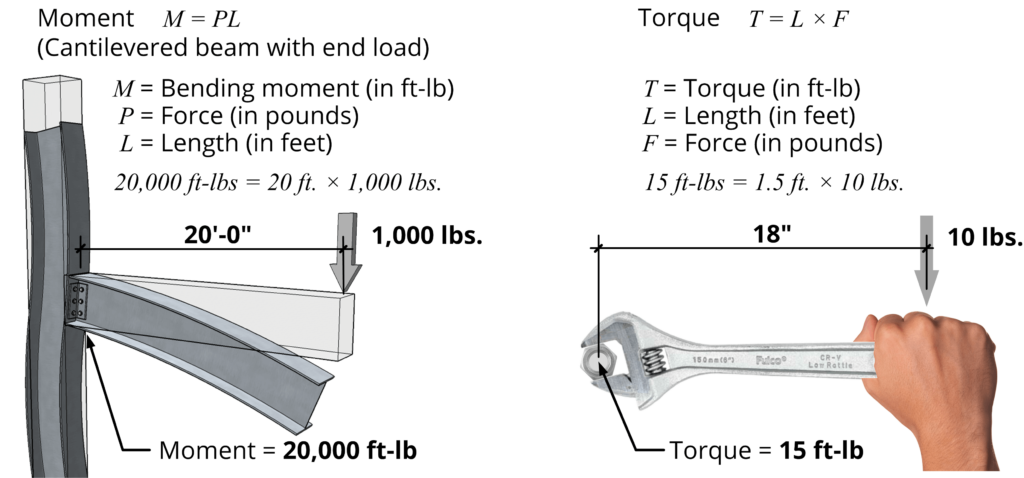
Here's an illustration to help you understand the similarity between moment and torque.
Bending moment & torque are measured as force ✕ distance
The force acting on a beam/column connection is similar to that on a nut/bolt connection when it's tightened by a wrench. They are dimensionally equivalent, i.e., the product of the force and its distance from the connection.
In architecture and structural engineering, moment and torque are closely related concepts that play a crucial role in the design and analysis of structural connections. Moment in a column-beam connection refers to the force acting on the connection multiplied by the distance from the point of rotation. Similarly, torque in a nut-bolt connection refers to the rotational force acting on the connection, which is the product of the force and the distance from the axis of rotation.
A column-beam connection in a rigid-frame structure must be designed to resist the moment forces acting on the structure. Likewise, in a bolted connection, the rotational force applied to tighten the nut and bolt, torque, must be carefully measured and controlled in order to ensure the stability and longevity of the connection.
While similar, moment and torque are unique concepts. In broad terms, moment is for static cases, i.e., when a force acts from a distance but no movement occurs. However, torque is dynamic in nature when there is motion, i.e., measuring the turning force of a rotating object.
For our purposes, ignore the semantics of "foot-pounds" vs. "pound-feet." That's a discussion for another time, and is beyond the scope of the ARE. Instead, consider this; 1 foot-pound is a unit of energy equal to the energy transferred by applying one pound of force through a linear displacement (a rotational force) of one foot.
BTW, using a "torque wrench" is one of the four different methods (or tools) used to ensure that a high-strength bolt connection is secure (recognized by AISC).
- Turn-of-nut method (after initial tightening, position marks on the nut and bolt indicate the amount of additional nut rotation required, e.g., 1/3 turn, 1/2 turn, etc.)
- Calibrated wrench method (a torque wrench indicates when the required amount of torque is applied to the nut)
- Twist-off bolt/tension control bolt method (a specialized tool is used to tighten the nut until the end of the bolt snaps off)
- Direct tension indicating method, DTI (special washers indicate full tension, e.g., hollow bumps flatten out or silicone is squeezed out as the nut is tightened)